Intro
This is the second part in a series of posts on setting up a Raspberry Pi to fully utilize the Software & Hardware functionality of this platform to build interesting internet of things (IOT) applications.
Part-I is here https://techiecook.wordpress.com/2016/10/10/raspberry-pi-ssh-headless-access-from-mac-and-installing-node-processing/ … this covered the following:
- Enable SSH service on the Pi
- Connect to Pi without a display or router – headless access via Mac
Part II: is this blog and it covers the following goals:
- Install Node, Express on the Pi
- Write a simple HTTP service
- Write an API to access static content ( under some /public folder)
- Write an API to POST data to the Pi
- Write an API to read GPIO pin information
So lets jump in ….
Install Node.js
Be it a static webserver or a complex API – you need this framework on the PI (unless you like doing things in Python and not Javascript)
How do I install this on the Pi?
wget https://nodejs.org/download/release/v0.10.0/node-v0.10.0-linux-arm-pi.tar.gz
cd /usr/local
sudo tar xzvf ~/node-v0.10.0-linux-arm-pi.tar.gz --strip=1
node -v
npm -v
Install Express
Easy to build APIs using the Express Framework
How do I install this on the Pi?
npm install express --save
Testing Node + Express
Write your first simple express HTTP API
I modified the code from here http://expressjs.com/en/starter/hello-world.html as shown below to provide a /health endpoint and a JSON response
- Create a folder called ‘simple-http’
- Mine is under /projects/node/
- Initialize your Node Application with
npm init
- Install express
npm install express --save - Write the application
- 2 endpoints – ‘/’ and ‘/health’
var express = require('express');
var app = express();

app.get('/', function (req, res) {
 res.send('API Running');
});

app.get('/health', function (req, res) {
 res.send('{"status":"ok"}');
});

app.listen(8080, function () {
 console.log('API Running ...');
});
- 2 endpoints – ‘/’ and ‘/health’

GET Static Content
- Create a “public” folder and put some content in it

- Setup the Node/Express app to use “express.static()”
var express = require('express');
var app = express();
var path = require('path');
app.use('/static', express.static(path.join('/home/pi/projects' + '/public')));
app.get('/health', function (req, res) {
  res.send('{"status":"ok"}');
});
app.listen(8080, function () {
  console.log('API Running ...');
});
- Test by accessing the “/static” endpoint

POST data
Install body-parser
npm install body-parser --save
Use the body-parser
var bodyParser = require('body-parser');
app.use(bodyParser.json());
app.use(bodyParser.urlencoded({ extended: true }));
Write the POST function … in my case I want to be able to do POST /api/readings
app.post('/api/readings', function(req, res) {
    var d = new Date();
    var value = req.body.value;
    var type = req.body.type;
    res.send('{ "status":"updated"}');
    console.log('Reading | '+d.toLocaleDateString()+'|'+d.toLocaleTimeString()+' | value='+value+' | type='+type);
});
Test It!
To test it we can issue a curl command from a computer connected to the same network as the Raspberry Pi….
curl -X POST -H "Content-Type: application/json"  -d '{
 "value":7.5,
 "type":""
}' "http://192.168.3.2:8080/api/readings"

Note: In the example above, I run the command from the terminal and later in Postman from the Mac hosting the Raspberry Pi … remember the IP for my Pi was obtained via the following command
netstat -rn -finet
Read GPIO Pin Information
What are GPIO Pins?
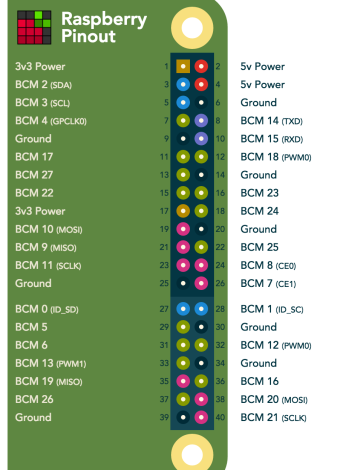
The Raspberry Pi comes with a input/output pins that let you connect to electronic components and read from them or write to them … these general purpose input output pins vary in number based on the model of your Pi – A, B, B+ etc
See http://pinout.xyz/ for how pins are labelled …

Our Goal: API for accessing GPIO pins
Once we know which pins we want to read/write to, we need to be able to access this from our application … in our example this would be the Node.js application we are writing.
So we would like to be able to something like
- GET /api/gpio/pins and list all the pin details (id, type etc)
- GET /api/gpio/pins/{pinId} and get the value of a pin
- PUT /api/gpio/pins/{pinId} and set it to high/low or on/off
Setup Javascript Libraries for GPIO access
- Install “gpio-admin” so that you do not have to run your Node application as root to read / write to the gpio pins (Read https://github.com/rakeshpai/pi-gpio)
git clone git://github.com/quick2wire/quick2wire-gpio-admin.git cd quick2wire-gpio-admin make sudo make install sudo adduser $USER gpio - Install the npm gpio package (Read https://www.npmjs.com/package/rpi-gpio )
npm install rpi-gpio
- Use this in your application
- Watchout: The gpio operations are Async … this means that capturing ‘value’ of a pin, for instance, cannot be done like ‘var value = readInput()’ in Node.js we need to use “Promises” (Read: https://developer.mozilla.org/en-US/docs/Web/JavaScript/Reference/Global_Objects/Promise – Thanks Alvonn!)
- “ReferenceError: Promise is not defined”: It appears the version of Node for the Pi (v0.10.0) does not have this library … ouch! Luckily other have hit this problem at some point with node and have posted the following solution which worked …
- Install the “es6-promise” library manually
npm install es6-promise@3.1.2 -
Declare Promise as the following in your application
var Promise = require('es6-promise').Promise;
- Install the “es6-promise” library manually
- Finally make the GPIO call
- Declare a ‘gpio’ variable and setup (attach to a pin)
var gpio = require('rpi-gpio'); gpio.setup(7, gpio.DIR_IN, readInput); function readInput() { gpio.read(7, function handleGPIORead(err, value) { console.log('Read pin 7, value=' + value); }); } - Read from it Async in a HTTP GET /api/gpio/pins/{pinId} call
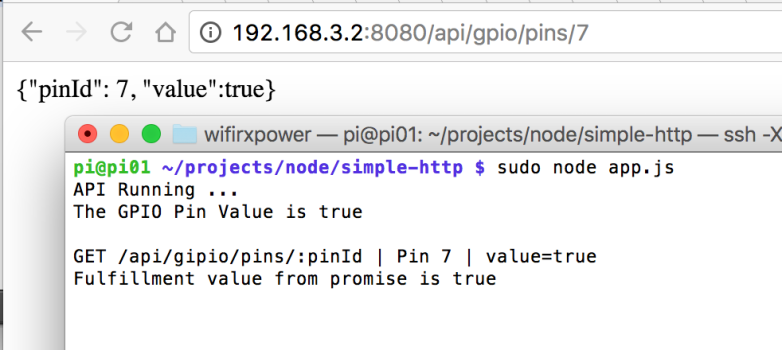
var Promise = require('es6-promise').Promise;app.get('/api/gpio/pins/:pinId', function (req, res) { var pinId = req.params.pinId; var value = ""; var p1 = new Promise(function(resolve, reject) { gpio.read(7, function handleGPIORead(err, value) { console.log('GET /api/gipio/pins/:pinId | Pin 7 | value=' + value); resolve(value); }); }); p1.then(function(val) { console.log('Fulfillment value from promise is ' + val); res.send('{"pinId": '+pinId+', "value":'+val+'}'); }, function(err) { console.log('Result from promise is', err); res.send('{"pinId": '+pinId+', "value":"Error"}'); }); }); - Output

- Declare a ‘gpio’ variable and setup (attach to a pin)
Show me the code
You can find the code for this project here:
git@bitbucket.org:arshimkola/raspi-gpio-demo-app.git
Summary
So by now we should have a platform primed to be used as a IOT device with a simple API running. We could have of course done all of the above in python.
Also we could have written a scheduled-service and “pushed” data from the Pi to some public API … in the next part of the series, we will talk about organizing IOT sensors in a distributed network
References
[1] https://scotch.io/tutorials/use-expressjs-to-get-url-and-post-parameters
[2] https://www.npmjs.com/package/rpi-gpio
[3] https://github.com/rakeshpai/pi-gpio
[4] https://developer.mozilla.org/en-US/docs/Web/JavaScript/Reference/Global_Objects/Promise